Manually rebuilding a beautiful design pixel-by-pixel in Elementor is one of the most time-consuming tasks in web development. This process, often filled with tedious adjustments to spacing, typography, and layout, creates a significant bottleneck between creative vision and a live website. What if you could automate this entire workflow, turning a static image into a fully functional, editable Elementor template in just a few minutes? This guide will show you exactly how to convert a design to an Elementor template using the power of AI.
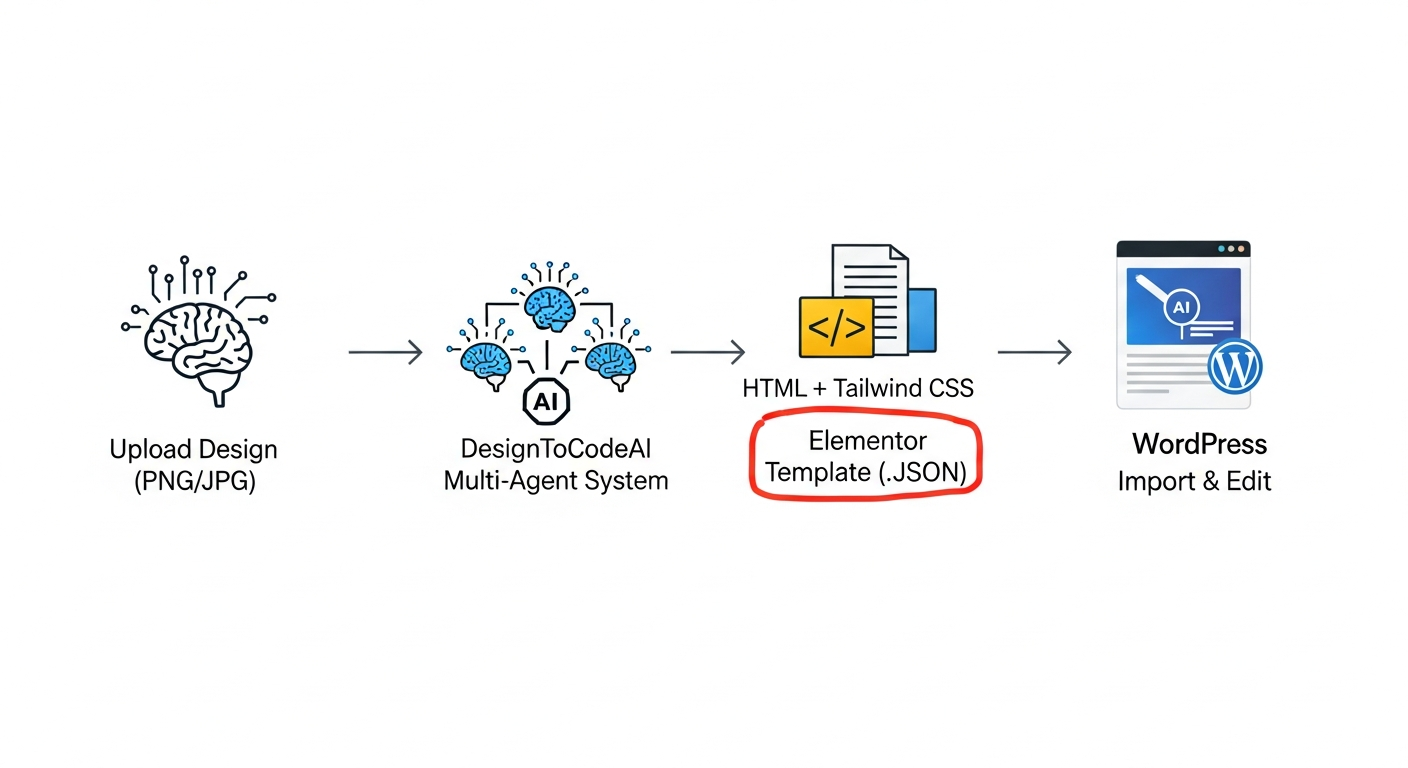
With modern AI tools like DesignToCodeAI, the slow and laborious process of manual conversion is becoming obsolete. This platform uses a sophisticated multi-agent AI system to analyze your design—whether it’s a PNG, JPG, or even a Figma export—and generates a clean, importable Elementor JSON file. By following this tutorial, you will learn how to drastically accelerate your development process, reduce manual errors, and bring your designs to life on WordPress faster than ever before.
Table of Contents
- What is DesignToCodeAI?
- Understanding the AI: How DesignToCodeAI Interprets Your Designs
- Step-by-Step Guide: Converting a Design Image to an Elementor JSON File
- Importing Your AI-Generated Template into WordPress
- Advanced Features for Power Users
- Pro Tips for Achieving Pixel-Perfect Accuracy
- Common Mistakes to Avoid When Converting Designs
- Common Challenges and Troubleshooting
- Use Cases: Beyond a Single Section
- Workflow Comparison: AI Conversion vs. Manual Rebuilding
- Frequently Asked Questions (FAQs)
- Conclusion: Revolutionize Your Elementor Workflow Today
What is DesignToCodeAI?
DesignToCodeAI is an AI-powered platform that automatically converts visual design images (like PNGs or JPGs) into production-ready code, including importable Elementor Template JSON files. It serves as a bridge between UI/UX designers and developers, streamlining the handoff process by eliminating the need for manual coding from a static image. The platform supports various inputs, including design images (PNG, JPG), screenshots, and even website URLs for redesign projects.
Core Technology: The Multi-Agent AI System
The core of the platform is its multi-agent AI system. Instead of a single AI model, it uses a team of specialized AI agents that collaborate on the conversion process. These agents are responsible for analyzing the layout, identifying components like buttons and text blocks, interpreting styling (colors, fonts, spacing), and writing the final code. This collaborative approach ensures higher accuracy and more structured, semantic output.
Supported Inputs and Outputs (HTML vs. Elementor JSON)
While it can generate standard HTML with Tailwind CSS, its most powerful feature for WordPress developers is the ability to create an Elementor Template JSON file. This file contains all the necessary data to perfectly reconstruct your design within the Elementor page builder, preserving the layout, widgets, and styling for seamless integration. This makes it an ideal tool for automated Elementor template creation.
Understanding the AI: How DesignToCodeAI Interprets Your Designs
To get the most out of an AI website builder for Elementor, it helps to understand how the technology works. The multi-agent system at DesignToCodeAI performs a sophisticated visual analysis, much like a human developer would, but at a fraction of the time. This process can be broken down into several key stages:
- Layout Detection: The first AI agent scans the entire image to identify the macro-structure. It detects containers, columns, and sections, understanding the hierarchy and spatial relationships between elements. It determines whether a layout uses a grid system, flexbox, or a simple stacked structure.
- Component Recognition: Once the structure is defined, other specialized agents identify individual UI components. They recognize headings, paragraphs, buttons, icons, images, and form fields. This is crucial for mapping the design to the correct Elementor widgets.
- Style Extraction: A dedicated agent analyzes the visual styling. It extracts color codes (HEX, RGBA), font families, font sizes, weights, line heights, and letter spacing. It also measures padding, margins, and border-radii to ensure the final output is pixel-perfect.
- Code Generation: With all the data collected, the final agent assembles the Elementor JSON file. It translates the identified structure and components into the corresponding Elementor widget schema, applying the extracted styles to each element. The output is a structured, readable JSON file ready for import.
This systematic, collaborative process is what allows the AI to handle complex designs with a high degree of accuracy, turning a flat image into a dynamic, editable template.
Step-by-Step Guide: Converting a Design Image to an Elementor JSON File
Transforming your design into an Elementor template involves a simple, five-step process within the DesignToCodeAI platform. This section will walk you through each stage, from preparing your initial image to downloading the final JPG to Elementor JSON file.
Step 1: Preparing Your Design for Optimal Conversion
Before uploading, ensure your design image is clean, clear, and high-resolution. The AI analyzes the image visually, so the quality of the input directly affects the output. For best results, export your design from tools like Figma, Sketch, or Adobe XD as a high-quality PNG or JPG.
Preparing Designs from Popular Tools
- Figma: Select the frame or group you want to export. In the ‘Export’ panel on the right, choose PNG or JPG format and select at least a 2x resolution to ensure clarity. Click ‘Export’ to save the file.
- Sketch: Select the artboard or specific layers. Click ‘Make Exportable’ in the bottom right corner. Choose your format (PNG or JPG) and size (e.g., 2x) before exporting.
- Adobe XD: Select the artboard. Go to File > Export > Selected. Choose PNG or JPG. For web designs, select ‘Web (1x)’ for standard resolution or ‘2x’ for high-resolution displays.
A crucial best practice is to convert multi-section pages by cropping and uploading each major section (e.g., hero, services, footer) as a separate image. This approach leads to cleaner widget mapping and greater accuracy.
Step 2: Uploading Your Design Image to the Platform
Navigate to the DesignToCodeAI generator. The interface provides a clear input source area. You can either drag and drop your design image directly into the designated box or click the ‘browse’ button to select the file from your computer. The platform accepts PNG and JPG files up to 20MB in size.
Step 3: Configuring the Generation Settings for Elementor
With your image uploaded, turn your attention to the ‘Output Settings’ panel. This is where you tell the AI what you want it to create.
- Generate option: Select ‘Elementor Template’. This instructs the AI to generate a .JSON file specifically for Elementor, rather than standard HTML.
- Iterations: Choose the number of refinement iterations the AI should perform. The recommended setting is 2, which offers a good balance between accuracy and generation time. More iterations can improve the precision for complex designs but will take longer and consume more Power Points.
Step 4: Initiating the AI Conversion and Monitoring Progress
Once your settings are configured, click the ‘Generate’ button. The platform will begin processing your request. You can monitor the progress in real-time via the console output, which shows the different stages of the AI’s analysis and code generation. The system provides an estimated time, which typically takes a few moments depending on the design’s complexity.
Step 5: Reviewing and Downloading the Generated JSON File
After the generation is complete, the output section will display the generated Elementor JSON code. You can use the built-in preview feature to see a live visualization of how the template will look. If the output is satisfactory, you can copy the code directly or, more conveniently, click the ‘Download’ button to save the .JSON file to your computer. This file is now ready to be imported into your WordPress website.
Importing Your AI-Generated Template into WordPress
With your .JSON file downloaded, the next phase is to bring your design into the Elementor environment. This process is straightforward and leverages Elementor’s native template import functionality.
Step 6: Navigating to the Elementor Template Library
Log in to your WordPress dashboard. In the left-hand menu, go to Templates > Saved Templates. This will take you to your Elementor Template Library, where all your saved templates are stored.
Step 7: Uploading the .JSON Template File
At the top of the Saved Templates page, click the ‘Import Templates’ button. An import dialog will appear. Click ‘Select File’ and choose the .JSON file you downloaded from DesignToCodeAI. Once selected, click ‘Import Now’. Elementor will process the file, and you will see your new template appear in the library list.
Step 8: Inserting and Previewing Your New Template on a Page
Create a new page or open an existing one and edit it with Elementor. Inside the editor, click the grey folder icon to open the template library. Go to the ‘My Templates’ tab, find your newly imported template, and click the ‘Insert’ button. Elementor may ask if you want to import the template’s document settings; it’s usually best to agree to this to maintain consistent styling.
Step 9: Making Final Tweaks and Adjustments in the Elementor Editor
Your design will now appear on the page, fully reconstructed with Elementor widgets. While the AI aims for pixel-perfect accuracy, some minor adjustments may be needed for complex designs. You can now use the standard Elementor editor to fine-tune any element, change text, replace images, or adjust responsive settings just as you would with any other template.
Advanced Features for Power Users
Beyond basic conversion, DesignToCodeAI offers advanced features that give you greater control over the output.
Using the ‘Redesign’ Feature
The ‘Redesign’ option is a powerful tool for modernizing an existing layout. Instead of a 1:1 conversion, the AI analyzes the structure and content of your input image (or a website URL) and generates a fresh, modern design based on current UI/UX trends. This is perfect for quickly creating updated concepts for a client’s outdated website.
Leveraging ‘Additional Instructions’
The text input box below the generator is not just for prompts; it’s a command line for refining your output. You can provide specific instructions to guide the AI. For example:
"Use the Elementor 'Icon Box' widget for the three feature sections.""Ensure all button text is uppercase and uses the color #5A4BFF.""Set the main heading's font to 'Poppins' with a weight of 700."
Providing these clear, concise instructions helps the AI make better decisions, especially for custom components or specific branding requirements, leading to a more accurate final template.
Pro Tips for Achieving Pixel-Perfect Accuracy
To get the best possible results from the AI, it’s important to provide high-quality input and leverage the platform’s features effectively. Here are some expert insights for optimizing your conversions.
- Convert Section by Section: For a full-page design, the most reliable method is to slice the design into its major sections (hero, features, testimonials, footer) and convert each one individually. This is because Elementor itself is a section-based builder. This approach improves AI accuracy by giving it a more focused area to analyze, results in cleaner widget mapping (e.g., a ‘Hero’ section becomes a single Elementor container), and gives you more modular flexibility when building the page.
- High-Resolution is Key: The AI “sees” your design. A blurry, low-resolution, or heavily compressed image will lead to inaccurate interpretations of fonts, colors, and spacing. For example, a slightly blurry ‘e’ might be mistaken for an ‘o’, or a subtle gradient might be flattened into a single color. Always use the highest quality export possible from your design tool (2x resolution is recommended).
- Leverage Iterations: The ‘Iterations’ setting is a powerful tool for refinement. A single iteration provides a quick draft. Setting it to 2 or 3 allows the AI to perform additional review and correction cycles on its own work. In these extra cycles, it double-checks spacing, re-evaluates font styles, and refines the responsive structure, often resolving minor layout or styling issues automatically.
Common Mistakes to Avoid When Converting Designs
Demonstrating first-hand experience, here are common pitfalls that can lead to suboptimal results and how to avoid them.
- Mistake 1: Uploading the Entire Page Design at Once. While technically possible, uploading a full-length screenshot of a long landing page often results in a single, monolithic Elementor template. This can be very difficult to edit and manage. The AI performs best with focused, single-viewport sections.
- Mistake 2: Using Low-Resolution or ‘Messy’ Screenshots. A common error is taking a quick screenshot that includes browser tabs, desktop icons, or compression artifacts. These visual distractions can confuse the AI, leading to incorrect element recognition. Always use a clean, cropped, high-resolution image exported directly from a design tool.
- Mistake 3: Ignoring the ‘Iterations’ Setting. Many users run a single iteration and then spend time manually fixing small errors. For any design with moderate complexity, setting iterations to 2 or 3 is more efficient. The extra minute of processing time can save you 15-20 minutes of manual adjustments in Elementor.
Common Challenges and Troubleshooting
Even with advanced AI, you might occasionally encounter issues. Here’s how to solve the most common ones.
- Issue: Incorrect Font Recognition. If the AI misidentifies a font, it’s often due to a very stylized or custom font in the image. The solution is to use the ‘Additional Instructions’ box to explicitly state the font family (e.g.,
"Set all paragraph text to 'Lato' font."). - Issue: Complex Layout Misinterpretations. For designs with overlapping elements or highly unconventional layouts, the AI might struggle with the layering (z-index) or alignment. The best fix is to simplify the source image by exporting the complex area as its own section or, again, use instructions to guide the AI’s layout logic.
- Issue: Blurry Image Issues. If your output has fuzzy text or icons, the source image was likely too low-resolution. There is no fix for this after the fact. Re-export your design at a higher resolution (2x or 3x) and run the conversion again for a crisp, clean result.
Use Cases: Beyond a Single Section
The power of an image to Elementor template converter extends far beyond single components. Here are some strategic ways to integrate it into your workflow:
- Full Landing Page Creation: Break down a full landing page design into 5-7 key sections. Convert each one individually, import them into your Elementor library, and then assemble them on a new page. This modular approach is fast and results in a well-structured, easily editable page.
- Rapid A/B Testing: A client wants to test two different hero section designs? Instead of building both manually, convert both design images in minutes. You can have two functional variations ready for an A/B testing plugin in under half an hour.
- Modernizing Old Websites: Take a screenshot of a client’s outdated, non-responsive website. Use the ‘Redesign’ feature to generate a modern concept, or do a 1:1 conversion and then quickly restyle the components within Elementor.
Workflow Comparison: AI Conversion vs. Manual Rebuilding
The efficiency gains from an AI-driven workflow are substantial. This table breaks down the key differences between the traditional manual process and using an AI tool to convert a design to an Elementor template.
| Factor | Manual Elementor Rebuild | DesignToCodeAI Conversion |
|---|---|---|
| Time Investment | Hours to days, depending on complexity. | Minutes per section. |
| Required Skill Level | Intermediate to advanced Elementor knowledge required. | Beginner-friendly; no coding required. |
| Accuracy & Consistency | Prone to human error and inconsistencies. | Highly consistent; AI follows the design precisely. |
| Cost | Developer time, which can be expensive. | Pay-per-use Power Points system; highly cost-effective. |
| Prototyping Speed | Slow; iterating on designs is time-consuming. | Extremely fast; ideal for rapid prototyping and client feedback. |
Frequently Asked Questions (FAQs)
Here are answers to some common questions about converting designs to Elementor templates with AI.
How accurate is the AI code conversion for Elementor?
DesignToCodeAI uses a multi-agent AI system designed to achieve pixel-perfect accuracy by analyzing layout, styling, fonts, and components. While most outputs are production-ready, highly complex or unconventional designs may require minor adjustments within the Elementor editor. Using the Iterations and Additional Instructions features can further refine the results.
What types of designs can I convert with DesignToCodeAI?
You can upload design images or screenshots in PNG or JPG format, with a maximum size of 20MB. This means you can export your designs from any major design tool—such as Figma, Adobe XD, or Sketch—as an image and upload it directly to begin the conversion process.
Is the generated Elementor template responsive and SEO-friendly?
Yes. The AI is trained to produce responsive layouts using modern CSS principles like flexbox and grid. It also generates semantic HTML structure, which is beneficial for SEO as it helps search engines understand the hierarchy and content of your page.
What if I’m not satisfied with the generated template?
If the initial output isn’t perfect, it is recommended to use the ‘Iterations’ feature to let the AI refine its work. You can also provide additional text instructions to guide the AI. For any clear technical issues where the generation fails, please contact the support team for a resolution. You can find more details on our comprehensive FAQ page.
How does the point system work for conversions?
Each generation consumes a set number of ‘Power Points’. The cost typically ranges from 300 to 500 Power Points, depending on the number of iterations you select for the conversion. New users receive 500 free Power Points upon signup to test the platform. You can purchase more as needed via different packs. You can check our points-based pricing for more details.
Are my uploaded designs and generated code stored on your servers?
No. For user privacy and security, neither your uploaded design images nor the generated code are stored on the servers. All data is processed temporarily in memory during your active session and is cleared afterward. It is important to save or download any generated code you wish to keep before exiting the page.
Conclusion: Revolutionize Your Elementor Workflow Today
Automating the design-to-code process is no longer a futuristic concept—it’s a practical and powerful way to enhance your web development workflow in 2026. By using an AI tool to convert a design to an Elementor template, you can save countless hours of manual work, minimize errors, and focus your energy on more creative and strategic tasks. This technology empowers developers, designers, and agencies to build high-quality websites faster and more efficiently than ever before.
By following the steps outlined in this guide, you can seamlessly integrate AI into your Elementor development process. The ability to transform a static image into a fully editable, production-ready template is a game-changer for anyone building websites with WordPress. Ready to accelerate your workflow? Try DesignToCodeAI for free and experience the future of web development.