
In the world of web development and design, inspiration is everywhere. You might discover the perfect hero section, a unique component layout, or a brilliant user flow on an existing website. The traditional next step is a painstaking manual process of inspecting elements, guessing at styles, and rebuilding it all from scratch. This workflow is slow, tedious, and often fails to capture the original design’s nuance. What if you could skip the manual work entirely and convert that visual inspiration directly into production-ready code?
With DesignToCodeAI, you can. The platform’s powerful Website URL to Code feature uses a sophisticated multi-agent AI system to analyze any public website and generate clean, responsive HTML with Tailwind CSS or a ready-to-import Elementor Template JSON file. This guide provides a complete, step-by-step tutorial on how to use this feature to accelerate your workflow, from initial URL input to refining the output for pixel-perfect results.
Key Takeaways
- Convert Any URL: Instantly generate HTML with Tailwind CSS or an Elementor Template from any public website URL, turning inspiration into assets in minutes.
- AI-Powered Refinement: Use plain English text prompts to fine-tune the generated code, correcting styles, adjusting layouts, and perfecting the output without writing CSS manually.
- Two Versatile Formats: Choose between production-ready HTML for custom projects or a JSON file for seamless import into the WordPress Elementor page builder.
- Privacy by Design: A strict no-storage policy means your inputs and outputs are processed in-memory and never stored on our servers, ensuring your data remains private.
Table of Contents
- What is DesignToCodeAI’s Website URL to Code Feature?
- Preparing for Your First Conversion: A Quick Checklist
- Best Practices for URL to Code Conversion
- Step-by-Step Tutorial: Converting a Website URL to Code
- The Art of Refinement: Achieving Pixel-Perfect Results
- Understanding the Limitations and Common Challenges
- Exporting and Implementing Your Production-Ready Code
- Advanced Use Cases for the URL to Code Feature
- Understanding the Technology: Quality, Security, and Cost
- Frequently Asked Questions
What is DesignToCodeAI’s Website URL to Code Feature?
DesignToCodeAI’s Website URL to Code feature is an AI-powered tool that converts the visual design of any public website into functional frontend code. By simply providing a URL, the system analyzes the site’s layout, styling, typography, and components, then reconstructs them as either a standalone HTML file with Tailwind CSS or an Elementor Template JSON file. This isn’t just a screen-capture tool; it intelligently interprets the design to produce structured, semantic, and responsive code.
The technology is driven by a multi-agent AI system. This approach is more robust than single-model systems because specialized agents for layout, styling, and code review collaborate to ensure higher fidelity. One agent analyzes the overall structure, another focuses on styling details, a third reviews the output for accuracy, and a fourth optimizes the final code. This collaborative process ensures a higher degree of precision and is invaluable for freelance developers, design agencies, and product managers who need to quickly prototype ideas, modernize old websites, or build new pages based on proven design patterns.
Preparing for Your First Conversion: A Quick Checklist
Before you begin, a little preparation ensures a smooth and successful conversion process. Following this checklist will help you get the best possible results from the AI.
- Set Up Your Account: To get started, you’ll need a DesignToCodeAI account. New users receive 500 free points upon signup, which is enough to run your first few conversions and experiment with the platform’s features.
- Choose an Optimal Source URL: The AI works best with websites that have clear, modern layouts built with standard HTML structures. While it can handle complex designs, starting with a well-structured site will yield the most accurate initial output.
- Understand Your Output Options: Decide whether you need standalone HTML or an Elementor template. If you’re building a custom project or working outside of WordPress, HTML with Tailwind CSS is ideal. If you’re building a WordPress site with Elementor, the Elementor Template JSON is the fastest way to integrate the design.
Best Practices for URL to Code Conversion
To get the most out of the AI and ensure high-quality results, keep these best practices in mind:
- Prioritize Clear DOM Structures: Websites built with clean, semantic HTML and well-defined sections convert more accurately. Sites with convoluted, nested layouts may require more refinement.
- Avoid JavaScript-Dependent Layouts: The AI excels at capturing HTML and CSS. If a site’s core layout is rendered heavily by client-side JavaScript after the page loads, the AI might not capture it perfectly. Look for sites where the primary structure is present in the initial server response.
- Use Screenshots for Complex Sections: For long, complex pages, a better strategy is often to take high-resolution screenshots of individual sections (e.g., header, hero, features, footer) and convert them one by one using the ‘Upload Design’ feature. This gives you modular Elementor templates that are easier to manage and assemble.
- Leverage the ‘Redesign’ Feature for Outdated Sites: If your source URL is for a visually dated website, don’t just clone it. Select the ‘Redesign’ option to let the AI reinterpret the content and structure with a modern, professional aesthetic. It’s a powerful way to kickstart a modernization project.
Step-by-Step Tutorial: Converting a Website URL to Code
Let’s walk through a real-world example. We want to create an Elementor template based on the clean, professional layout of a well-known B2B SaaS website. The process is straightforward.
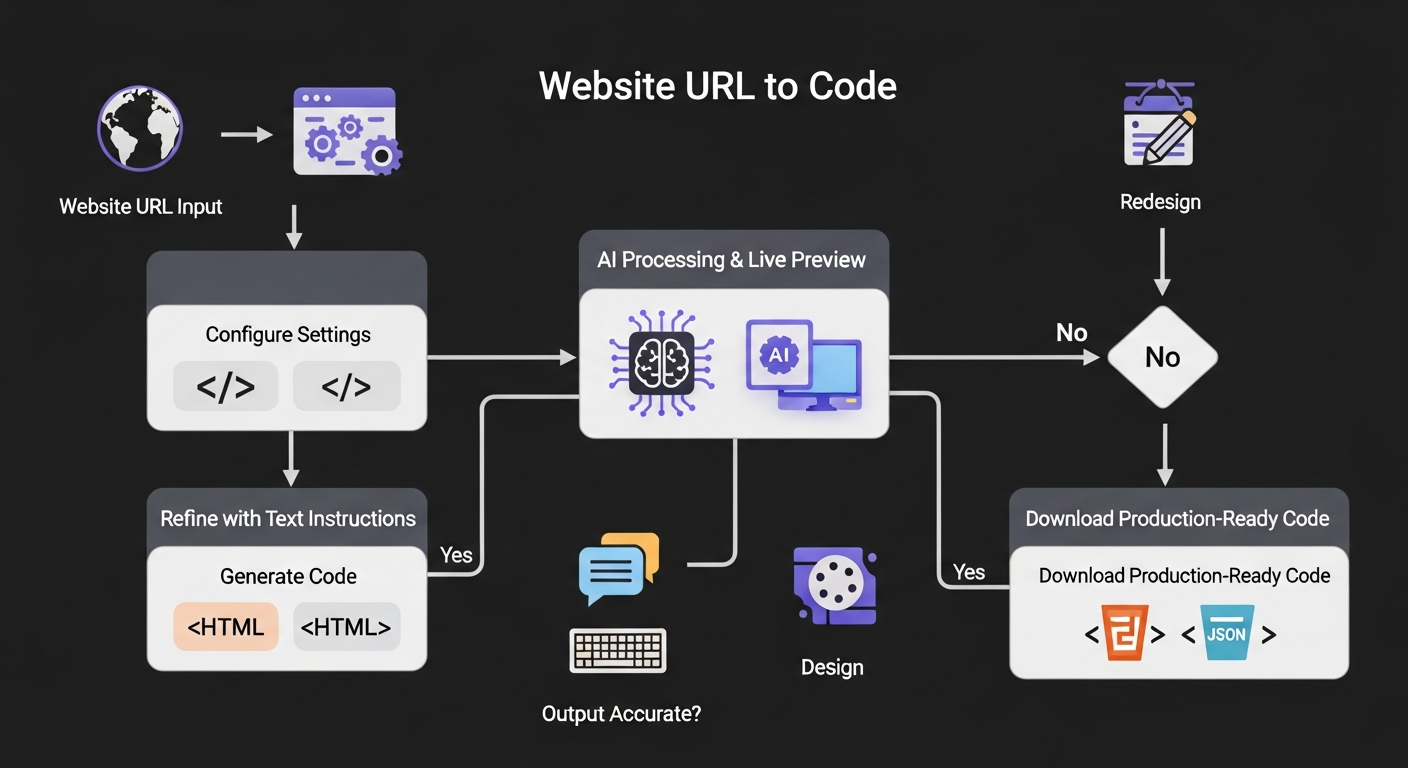
- Select ‘Website URL’ as Your Input Source: On the main generation screen, click on ‘Website URL’ to activate this mode.
- Enter Your Target URL: In the ‘Website URL’ field, paste the full public URL of the website you want to use for inspiration. For our example, we’ll use a hypothetical clean agency site.
- Configure Your Output Settings: In the ‘Output Settings’ panel, select ‘Elementor Template’. This will instruct the AI to generate a JSON file compatible with the Elementor page builder.
- Set the Number of AI Iterations: Iterations determine how many times the AI refines its own work. The recommended setting is 2, as it provides a good balance between accuracy and generation time. We’ll start with 2 iterations.
- Initiate AI Generation: Click the ‘Generate’ button. The system begins processing, and you can watch the real-time log in the Console window as the AI analyzes the DOM, extracts styles, and builds the Elementor widget structure.
The Art of Refinement: Achieving Pixel-Perfect Results
The first AI-generated output is often remarkably accurate, but let’s say our initial preview shows a minor issue: the main call-to-action button is dark grey instead of the brand’s vibrant blue. This is where DesignToCodeAI’s iterative refinement becomes a superpower.
Instead of digging through code, we can guide the AI with a simple text instruction. Below the live preview and code view, you’ll find a text input field. To fix our button, we type a clear, concise command:
Make the hero section's main button background color #3B82F6 and the text color white.
After entering the instruction, we click the ‘Refine’ button. The AI processes this natural language request, regenerates the relevant part of the code, and updates the live preview. The button now perfectly matches our brand requirements. This feedback loop allows you to fine-tune the design until it’s exactly right, saving hours of manual CSS adjustments.
Experienced developers often use refinement for more than just colors. You can make structural changes like ‘Combine the two columns in the services section into a single three-column grid’ or ‘Increase the top and bottom padding for all sections to 80px’. This conversational approach to coding is incredibly efficient.
Understanding the Limitations and Common Challenges
While incredibly powerful, AI code generation has certain limitations. Understanding them helps you set realistic expectations and use the tool effectively.
- Complex Animations & Interactions: The tool focuses on converting static layout and styling. It will not replicate complex JavaScript animations, parallax scrolling effects, or intricate hover states. These interactive elements must be implemented manually after the base structure is generated.
- Content Behind Logins: The AI can only access public URLs. It cannot log in to websites, so any content or design elements behind a paywall or user authentication will not be converted.
- Single-Page Applications (SPAs): SPAs built with frameworks like React or Vue that render content heavily on the client-side can be challenging. The AI captures the initial HTML sent from the server, which may be just a basic skeleton. For these cases, the screenshot-to-code method is often more reliable.
- Long Pages: The AI analyzes the content visible in a standard browser viewport. For very long landing pages, it may not capture content far below the fold. The recommended best practice is to take scrolling screenshots of each major section and convert them individually.
Exporting and Implementing Your Production-Ready Code
Once you’re satisfied with the refined output, the final step is to export the code. The platform provides simple ‘Copy’ and ‘Download’ buttons for easy access.
HTML Output vs. Elementor Template: Which Should You Choose?
Your choice of output format depends on your project’s technical stack. The table below breaks down the key differences.
| Factor | HTML with Tailwind CSS | Elementor Template JSON |
|---|---|---|
| Best For | Custom web projects, non-WordPress sites, static sites, and developers comfortable with code. | Rapidly building pages on WordPress websites that use the Elementor page builder. |
| Technical Skill Required | Intermediate knowledge of HTML and CSS. | Basic WordPress and Elementor knowledge. No coding required. |
| Customization Flexibility | Unlimited. You have full control over the source code. | High. All elements are mapped to Elementor widgets for easy drag-and-drop customization. |
| Framework | Tailwind CSS (A popular utility-first CSS framework that makes styling fast and consistent). | Elementor Widget Structure. |
Next Steps for HTML Output
If you download the HTML output, you’ll receive a single `.html` file containing the structure and Tailwind CSS classes. To make it render correctly, you must include the Tailwind CSS library. The easiest way is to add the Play CDN script to the “ of your HTML file. Here is a boilerplate you can use:
<!DOCTYPE html>
<html lang="en">
<head>
  <meta charset="UTF-8">
  <meta name="viewport" content="width=device-width, initial-scale=1.0">
  <script src="https://cdn.tailwindcss.com"></script>
  <title>Your Page Title</title>
</head>
<body>
  <!-- PASTE YOUR GENERATED CODE HERE -->
</body>
</html>
Editing Your Template in Elementor
If you chose the Elementor output, you’ll download a `.json` file. To use it:
- Navigate to your WordPress dashboard.
- Go to Templates > Saved Templates.
- Click the ‘Import Templates’ button at the top.
- Select the JSON file you downloaded and import it.
- Once imported, open any page with the Elementor editor, add a new section, and click the grey folder icon to open your template library. Find your newly imported template and click ‘Insert’.
- You can now edit all text, replace images, and adjust styles using Elementor’s visual editor panels.
Advanced Use Cases for the URL to Code Feature
Beyond simple page replication, the Website URL to Code feature unlocks several advanced workflows:
- Rapid Prototyping a Competitor’s Feature: Need to build a prototype of a feature you saw on a competitor’s site? Convert their page to HTML to get a functional baseline, then modify the code to fit your branding and requirements.
- Modernizing a Legacy Website: Use the ‘Redesign’ option to get an AI-generated, modern take on an old, outdated website. It’s a fantastic starting point for a complete visual overhaul.
- Extracting Specific Components: If you only need a specific component like a pricing table or a navigation bar, convert the page and then simply copy the relevant block of HTML from the generated code.
- Deconstructing Complex Layouts for Learning: For junior developers, converting a complex, professionally designed website is an excellent way to learn. By examining the AI-generated HTML and Tailwind CSS, you can see how advanced layouts are constructed.
Understanding the Technology: Quality, Security, and Cost
DesignToCodeAI is built on three core principles: high-quality output, robust security, and transparent pricing.
The AI is trained to produce clean, semantic HTML and use modern CSS practices like flexbox and grid, ensuring the generated code is both responsive and SEO-friendly. Search engines can easily parse the structure, and layouts adapt seamlessly to different screen sizes.
Critically, the platform operates on a strict no-storage policy. Your submitted URLs and generated code are processed temporarily in-memory and are never written to disk or stored on our servers. This ensures your intellectual property and project details remain confidential.
The service uses a points-based system, offering flexibility without locking you into a subscription. Each generation costs between 300 and 500 points depending on the number of iterations selected. You can find more details on the Pricing page.
Frequently Asked Questions
Here are answers to some common questions. For more information, please visit our full Frequently Asked Questions page.
What is the accuracy of the AI code conversion from a URL?
DesignToCodeAI aims for high accuracy by using a multi-agent AI. While many outputs are nearly production-ready, complex sites may require minor adjustments using the built-in refinement tools. Accuracy is highest on sites with standard, clean HTML structures.
What output formats does DesignToCodeAI provide for URL conversions?
You can generate a single HTML file with Tailwind CSS or an Elementor Template JSON file. The JSON is ready for direct import into your WordPress site via the Elementor template library.
Does the URL to Code feature work with single-page applications (SPAs) built in React or Vue?
It depends. The tool captures the initial server-rendered HTML. If the SPA’s layout is mostly rendered by client-side JavaScript, the output may be incomplete. For SPAs, using the ‘Upload Design’ (screenshot) method is generally more reliable.
How does the tool handle responsive design and mobile layouts from a URL?
The AI analyzes the CSS and structure to generate responsive code using modern techniques like flexbox, grid, and Tailwind’s responsive prefixes. The output is designed to be mobile-friendly, but it’s always recommended to preview and test on multiple screen sizes.
What’s the difference between using the URL input versus the Screenshot input?
The URL input is best for quickly capturing an entire page’s structure and code when the source is well-built. The Screenshot input provides more control, allowing you to convert specific, isolated sections of any site (even SPAs or complex apps) with very high visual fidelity. For multi-section Elementor pages, converting section-by-section via screenshots is the recommended workflow.
The ability to transform a website URL into clean, functional code is a game-changer. It bridges the gap between inspiration and implementation, enabling you to build faster, learn from existing designs, and prototype with unprecedented speed. By leveraging AI, you can focus more on creativity and less on the repetitive task of manual coding.
Ready to accelerate your development process? Try It Free today and convert your first website URL into production-ready code in minutes.